*****CANYON HAS CHANGED read this whole post, (including comments) before visiting Griffin, as the guidebook description appears to be mis-leading for some people. *****
Max drop 29m (2x60m ropes)
9hr30
Public access
Griffin is one of the classic canyons of NZ, definitely top 5 according to the author of the Canyoning in NZ guidebook.
Big, watery, beautiful, long, technical.. Jumps galore into pumping whitewater. Huge pools, powerful waterfalls… This canyon is a pure gem in NZ!
Lower Griffin
A great half day trip, the lower section from the ‘hydro track’ down is much less technical than the upper section.
Download a GPX file for the approach track (Thanks to Troy Watson). The track is well formed and clear as of January 2024.Guidebook update 12 Mar 2017:
Ropes
The book recommends 2x40m, which is a typo. It should read 2x 60m, since you’ll need to leap-frog, and frequently pitches require the ability to easily lower, or pay out more.
R2 13m or J 10m
Bolts were damaged, and have been replaced by another double bolt anchor about 1m to the left of the old one where it should be protected from floods.
Bodengo Falls R8-R10:
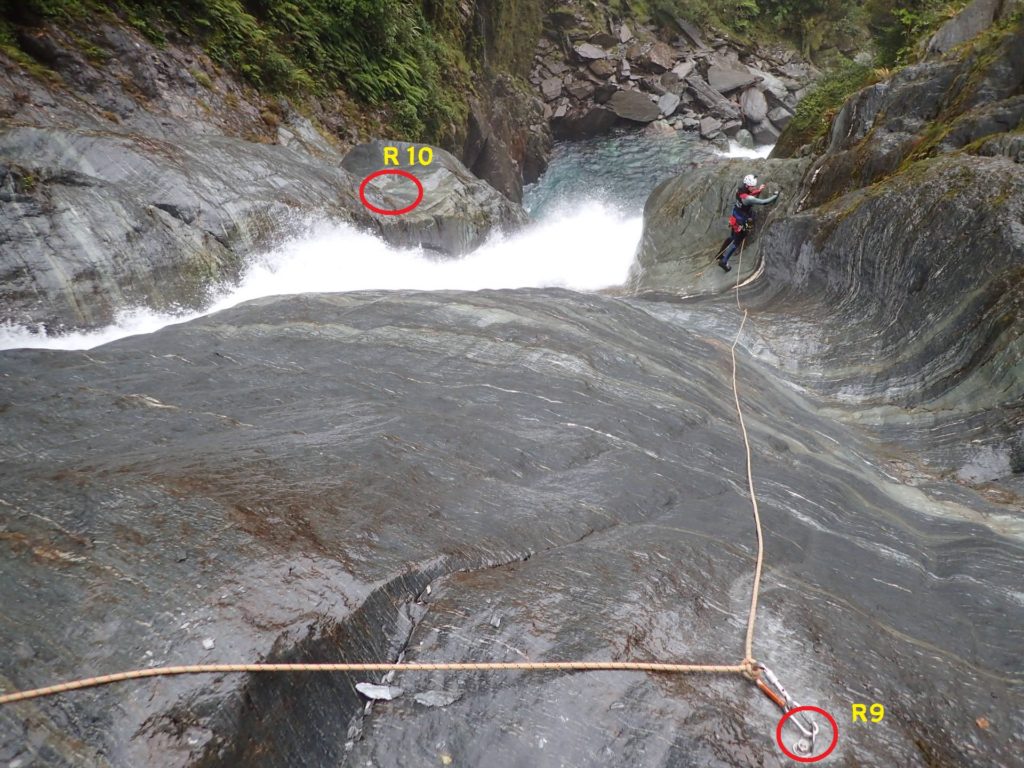
Unfortunately the description in the guidebook is a little misleading, according to subsequent parties who have descended this canyon. The main problem is trying to access the R10 TL anchors by leaping over the flow is nearly impossible, and highly risky. (See PIC 3 for a view of that spot). The subsequent teams placed extra bolts on the TR in order to avoid this risk, but its a tricky sequence to put together.
This sequence is by far the technical crux of the canyon, and most parties will (should) bypass the section on the TL as described in the book. If the following description is confusing, then the bypass is for you. If you’ve got a strong team with excellent problem solving skills and are very careful to ensure you always have a line of retreat, then following the water through the Bodengo Falls section is an excellent and highly technical bit of canyoning.
R8 can be a J18m into a big clean pool.
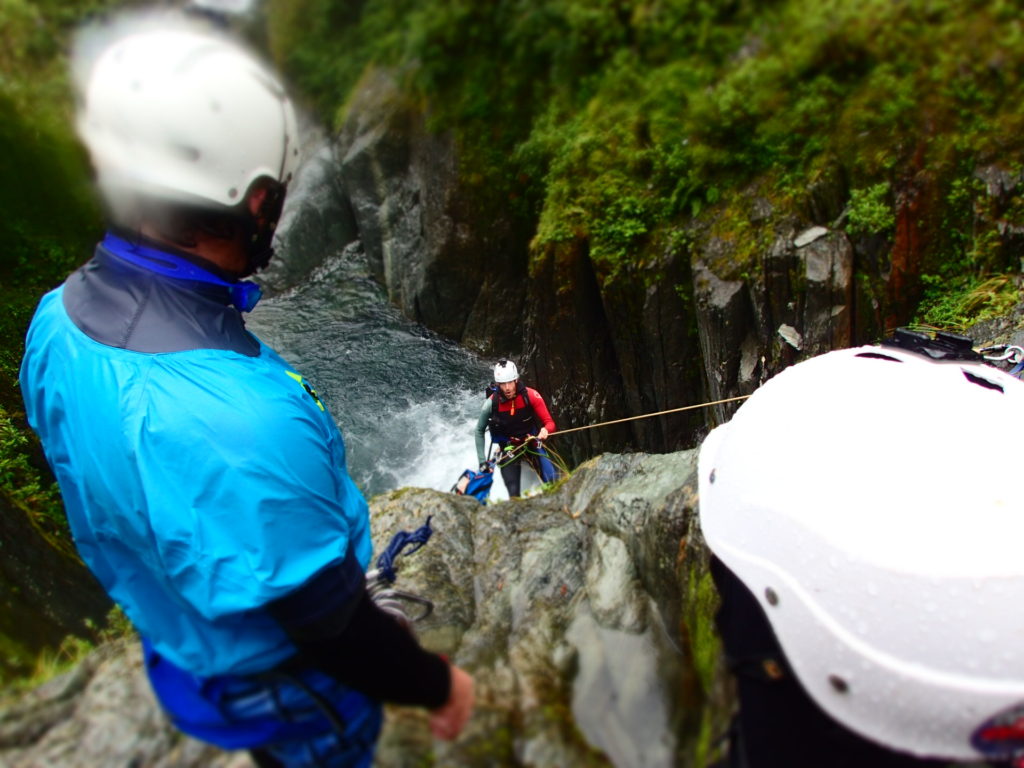
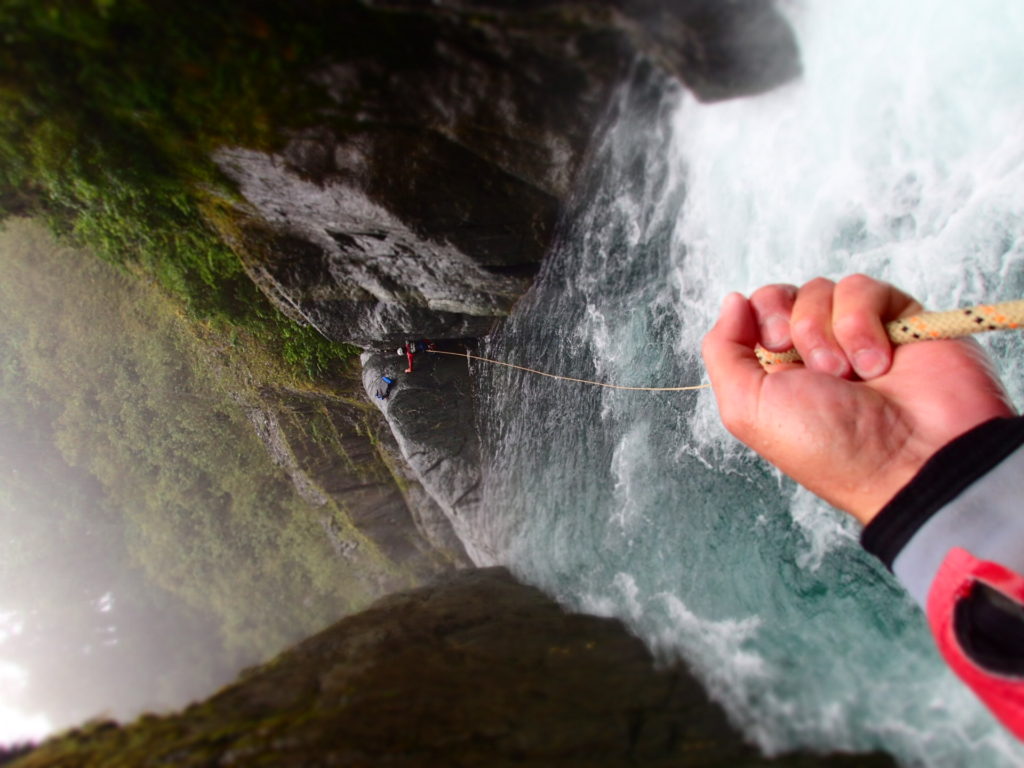
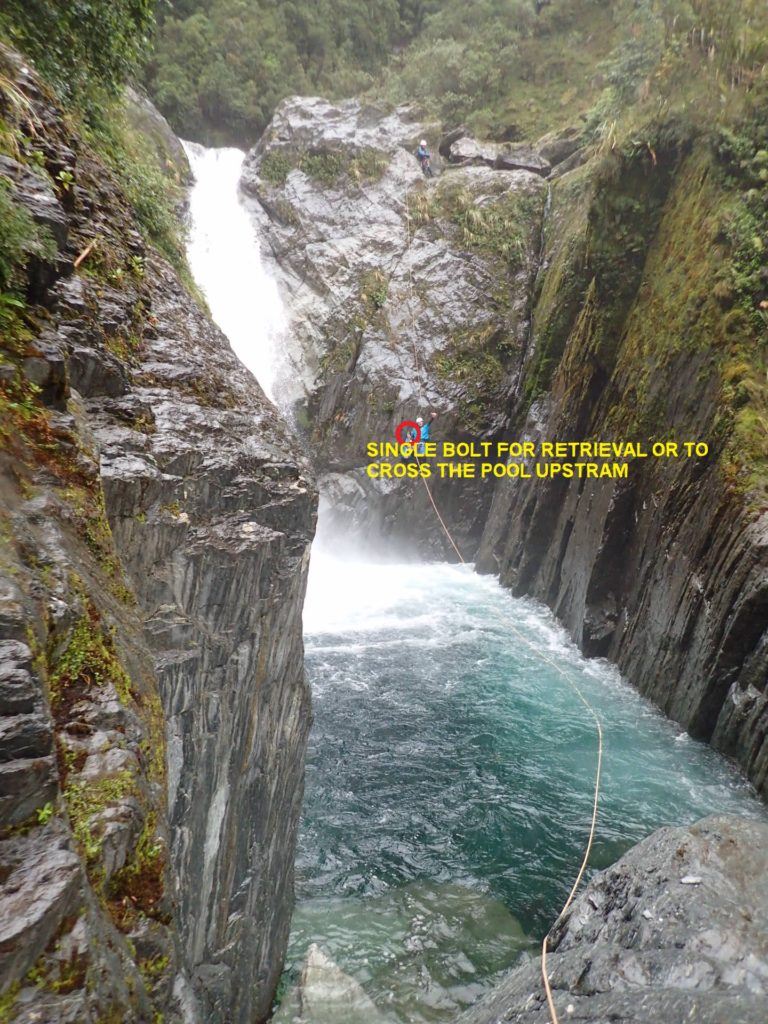
There is one new bolt at the bottom of R8 by the waters edge. This is set as a ‘retreat bolt’ ie, if you get to R9 and can’t make the moves to get to the R10 anchor (or any anchors are damaged), you’ll need to have pre-placed a retreat line on that bolt in order to pull yourself back upstream (its not possible to swim against the current due to the shape of the walls there). (PIC 2 is the view from that bolt and PIC 4 is looking back at it.)
(PIC 3: Shows the existing R10 TL anchors as described in the guidebook.)
There is a new single bolt at R9 TR.
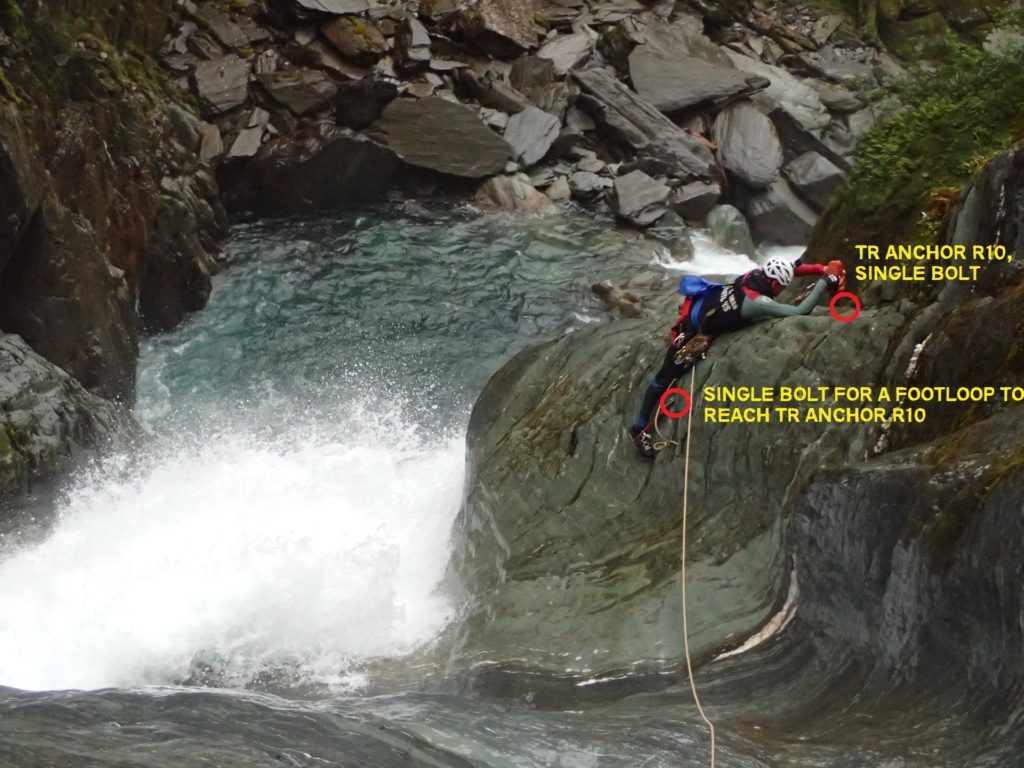
A new bolt anchor has been installed part way down the slab (in a crack system, hopefully protected from floods. In PIC 5 the Canyoner using that new bolt anchor with a footloop to access the new R10 TR anchor as described in this update.
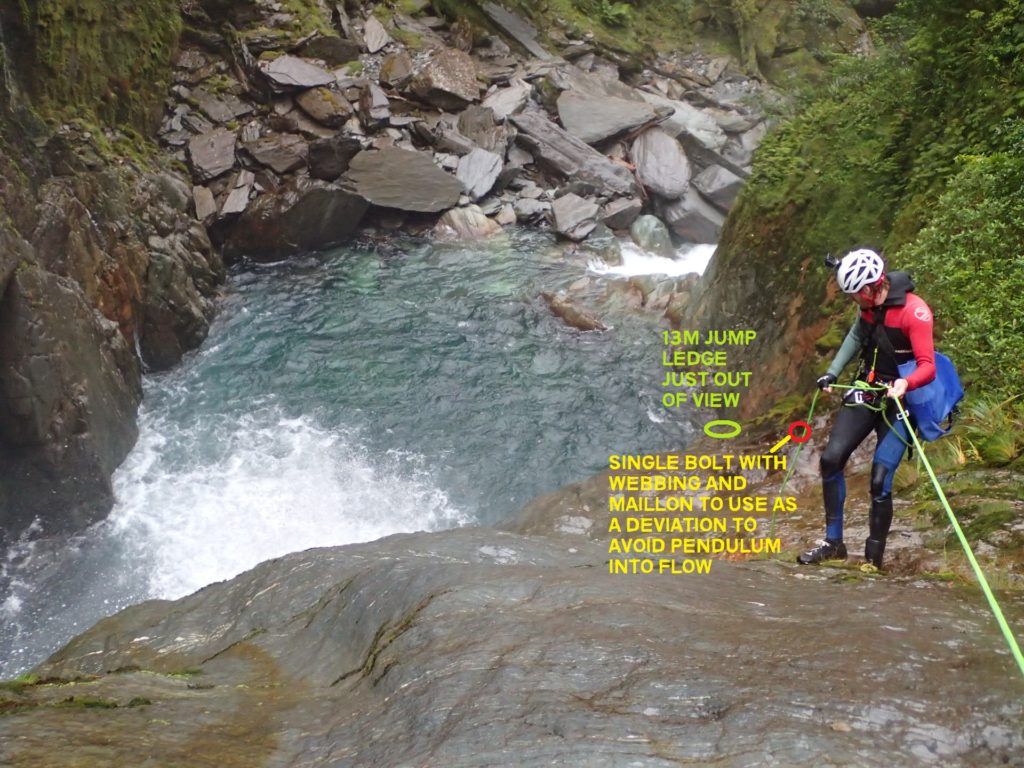
The R10 anchor has a devation bolt lower down, which must be use to avoid the extremely powerful flow. (see PIC 6). About 5m below the deviation there is a ledge to get off the rope to do a 13m jump into the pool.


Did the lower section only. This is good as a much shorter trip, and the track up isn’t hard to find. Bring a spray bottle for your shoes for crossing the creek at the bottom, but also it’s already quite slimy in the canyon – some of the downclimbs are very slippery. Took maybe 3hrs in the canyon but we weren’t in a hurry. Anchors are good, final pitch is webbing. Might want to belay some climbs but natural anchors usually aren’t hard to find.
Awesome to be back in this epic canyon!
Only had time for the lower section this time.
Some local legends have taken the time to cut and mark the old hydro track, which makes for a nice half day or if you’re not keen for the full mission.
It’s a little tricky to find but there is a nice park on the TL of the bridge, from here you just walk up stream to a river flat and it’s marked from there.
Looks like some good high water recently but all anchors still in good condition.
If anyone’s going in with a drill there are a few spots near the end that could do with a bolt to facilitate down climbs and pool checking.
What an amazing canyon!!
Water level i between the two photos shown in the guide book, Very sluggish up the hill after 3canyons on the previous days. But the path is well formed.
At the turn off to go down you can go about another 1min along the track for a 360 view of the area that is quite spectacular
Bolts/hangers slings in good condition except mayb r16 which we could not find and used a tree instead .
No hangers on Bodengo falls TR route R8 and no hanger on the foot loop anchor also. We put those on and removed them again after use as per trip report comments below. The last two people jumped R8 once we had confirmed R10 was all good to jump.
Replaced the sling on the deviation anchor but will likely need to be done again as the rapids is very rusty, if you can get the rapide off the hanger it would be good to replace, in hindsight we could have replaced the whole hanger and removed the rapide after the canyon. Didn’t think of that at the time.
The last down-climb is up into the bush TL then back down to the river. The alternative step to the side of the flow flow isn’t too hard but if is slippery the consequence is high.
Such a great day out, More and more beautiful at every turn!
Lovely day in the canyon
Canyon in great condition
Will need to take a hanger for R8 if going that way and looks like footloop bolt at R10 is gone
Not sure about condition of R10 and deviation bolt
Left side good to go
Tape linking bolts in upper canyon is ok but might need replacing soon
Another awesome descent of Griffin, it never gets old!!
Please read this update in combination with all previous reports and photos, and carefully read about the ‘Bodengo Falls’ sequence.
The flow was low. We did a bit of work on the R8, R9 and R10 sequence.
R8 still has no hangers as a reminder to not go that way if you’re not prepared for it. So BYO 2 hangers with M10 nuts if you sure your team can get down the whole sequence.
It is still recommended to make sure you can retreat back up to the top of R8 until you have verified that you can reach the R9 and R10 (including deviation) and the anchors are in tact.
It seems like the flake used to climb out of the pool up to R9 has been stripped off which makes the climb harder. When it is generally very slippery in the canyon then it will most likely be a difficult climb.
R9 bolts were damaged, we have taken the hangers off, hammered the bolts all the way down (not usable anymore) and placed two unlinked bolts about 1.5m further to the TR in a place which is better protected from big floods.
Just a reminder that traversing the flow on rappel to the True Left at the bottom of R9 to reach the bolts of R10 on the True Left SHOULD NOT BE DONE.
The footloop bolt to get up to the R10 on the True Right in still in tact.
A new bolt has been added to R10 on the True Right which is now also an unlinked double ringbolt anchor.
The deviation bolt is in tact with a short bit of webbing and karabiner. It is essential to clip this deviation to avoid swinging into the flow. When it is slippery be real careful to not slip before clipping it. In case it is super slippery there might be some small shrubs for a deviation higher up but we didn’t need that on our descent.
The amount of rope needed to get from the R10 anchor on the True Right via the deviation to the pool is about 40m. The first person can check the pool, the rest of the team can jump from the ledge below the deviation. You need about 25m of rope to reach the ledge.
So at this point the entire canyon (upper and lower) is set up with double bolt anchors. In the lower part, most (all?) sling has been replaced by chain. In the upper part the linked anchors are linked by webbing. Webbing was in worn both still ok condition, most anchors will need new webbing soon-ish.
An absolute gem of a canyon, so stoked to have been out there again!
Went through lower griffin. Nice trip great short trip. 2nd waterfall approach single bolt and hanger is very loose. Have submitted bolting fund and have a plan to replace. You can climb to single anchor bolt around corner not weighting loose bolt. Loose bolt didn’t pull out and if you are with a group some sort of belay could be done if worried. abseil into pool fine, off single bolt. Plan to make double. Everything else in lower fine. Plan to replace sling with stainless steel in progress. Loose bolt needs repair but should be able to go through canyon without repairs. Bolt just protect s top traverse to pitch head
After a recent trip down Griffin Creek I’d like to clear up the confusion around the Bodengo Falls section. First and foremost, from the top of R8 you must go left or go right, there are no other options.
Going TL involves heading up into the bush from the top of R8 then abseiling down to a ledge to bolts (TL R10) where you can abseil to the pool at the bottom. This can also be a jump.
Going TR involves a technical sequence which avoids heading into the bush but is tricky to get right and is time consuming. The TR sequence has previously been described and the photos paint a very clear picture but I’d like to share my experience so below is a full description of our version which worked well.
My personal opinion is that if you are a confident swimmer and enjoy a technical challenge then go right. If you want the most efficient and fun way with an awesome jump then go left.
At some point there should be a second bolt added to both R9 and TR R10.
TR sequence:
R8 has two bolts, one of which is quite rusty and there are no hangers or nuts so you have to take your own.
I was lowered from R8 down to the TL of the pool. From here I swam (still on belay) on the TL until I was past the turbulent water, then across to the pocket at the end of the pool on the TR. For an experienced white water person this is a relatively easy swim in normal flows, but would be fatal to not make the pocket. I did this towing a pack but it would have been easier to send it across on the rope afterwards
From the pocket I climbed the crack up to the R9 bolt and clipped the end of the R8 rope into it (so that those following could use it to pass bags and for safe access)
I then used a separate rope to abseil down to the foot loop bolt on TR. A problem I encountered was that the rock below the foot loop bolt was very slippery (due to the recent drought) and was therefore incredibly difficult to get to.
Once standing in the foot loop, the TR R10 bolt was easy to reach and clip into. At this point the others came across in the following manner:
Second canyoner abseiled down R8 and swam across the pool and up to R9.
Third canyoner derigged R8 (including the hangers) and threw their pack, tied to the end of the rope, into the pool which canyoner two pulled in quickly from R9, being careful that the pack didn’t get flushed over the waterfall.
Canyoner three then jumped from R8 and swam to the pocket on TR and climbed up to R9.
Canyoner two then brought me a rope so that I could rig TR R10.
The R10 abseil was also incredibly slippery and the deviation bolt was awkward to get to. I clipped the rope into the deviation carabiner and then the descent became much easier down to the pool. The others then followed.
On another note to make the whole trip simpler I feel that taking two 60m ropes is best.
This is a seriously fun canyon that totally deserves all the hype and support to keep it flowing naturally! A huge thank you to those that made it happen.
I went through Griffin last weekend and it was awesome! I feel strongly enough to comment that contrary to the guidebook, jumping over the flow to access the TL R10 bolts would be EXTREMELY risky and difficult and is not really an option.
Also, the R8 bolts currently have no hangers on them. This serves as a reminder that the R8, R9 & TR R10 Series is very technical and should only be attempted after careful evaluation by those with the highest level of technical skill. If you have any doubt as to your ability to complete this section safely then bypass it on the TL.