
Our reccomended reference for techniques for NZ canyons is the Canyoning Technical Manual.

A quick taster of canyon techniques
The manual above is the best reference for techniques, but the following words are a teaser for some of the topics that you’ll get to learn about!
Canyoning is a unique sport that requires unique skills.
Although the basic rock climbing, mountaineering or caving rope skills are an excellent foundation, You need specialised Canyoning rope skills to ensure safe and efficient progression through Canyons. These skills should be learnt from experienced canyoners or through a course.
Many of NZ’s Canyons have natural anchors. Which means It is usual for canyoners to have to build thier own descent anchors. Excellent rigging skills, plus plenty of anchor material is a must.
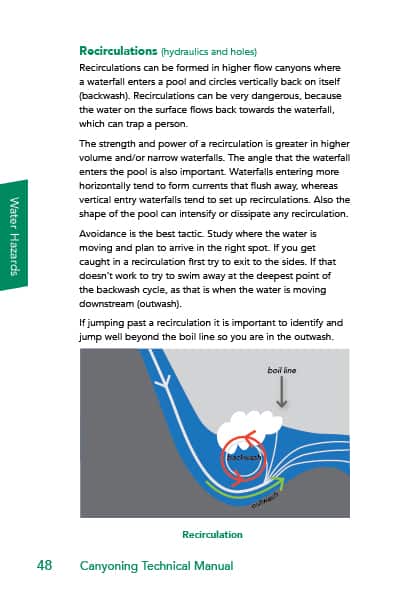
Some of NZ’s canyons are very high volume, technical descents. For these trips, you must have an excellent knowledge of Canyon hydrology, whitewater skills and swiftwater rescue techniques. Most canyons are highly condition dependant. A canyon might be a pleasant journey one day, but after even moderate rain, turn into a high water nightmare.
Off track Tramping/Hiking skills are a must for NZ’s canyons. So many of our trips are only accessable by steep, rough and confusing tramping through thick and untracked bush.
Disclaimer
Remember, online technique information can be published by anyone. Some online information may be misleading, incomplete or be read out of context. The information is an excellent start, but is no substitute for a course of training. The information here is subject to our disclaimer. Return to top.
PRIOR KNOWLEDGE
The concepts introduced below assume a level of prior rope knowledge consistent with intermediate skill levels in climbing, and/or vertical caving, eg someone who lead climbs, can rig existing anchors, rappel and ascend a rope with confidence.
The water techniques below assume confidence and experience in swimming, and jumping into river pools.
If you don’t have this experience, the best place to start is with a Canyoning Course. Return to top.
TEAM WORK
Canyons are beautiful, fun and challenging places, but they are also noisy, committing and potentially dangerous. Good teamwork is essential for both safety and efficient progression through a Canyon.
Keep an eye on your team. While moving through a canyon, it is vital to keep in visual contact with your team mates as much as possible. A narrow, water filled canyon can be
quite noisy, so you may not hear a cry for help, nor notice if your friend behind you were to slip on a rock, bump their head and fall into a deep pool. Keep looking back to check on your team mates, with the added benefit of being able to appreciate the view up canyon.
When anyone is jumping, sliding, abseiling or climbing, at least one person in the team should be keeping an eye on them, ready to alert the group and/or offer assistance if required. For example, Its easy to get caught up in excitement at the bottom of a jump with your mates, and forget to keep an eye on the jumper about to leap.
Keep an eye on your gear. Trying to abseil, swim or jump into or through current is more difficult with a pack. So sometimes it is easier and safer to throw packs or equipment across a water feature. When you do so, make sure you have visual contact with the
receiver before launching. Ensure that they are ready to quickly catch and secure the gear.
Help your team mates. Unlike climbing, canyons are usually descended with groups of 4 or more. That means there are plenty of spare hands available to do all the jobs that
need doing. It could mean managing the rope or so that the rigger can do their job unimpeded. It could mean digging out some muesli bars from your pack to offer the others when they have stopped rigging.
Whenever you are waiting with nothing to do, lookaround and think, how can I help the team and increase our efficiency?
Communicate. With the shape of waterfalls or the canyon walls, it may not be possible to keep in contact all the time. It is important to communicate before separating, exactly
what the plan is and where you will regroup. That way, the plan is more likely to run smoothly and confusion is avoided.
There are many different signals in use around the world (and between groups) so it is important to discuss the signals prior to the start of the trip. Also its worth re-confirming any signals if you are about to begin a complex sequence in the canyon.
Visual Signals. The canyon environment is often very noisy, so visual signals are usually the best way of communicating to someone away from you.
Audible Signals. Whistles should be carried when canyoning. These provide a way to gain attention quickly and/or communicate when out of sight from one another. Return to top.
MANAGING THE ROPE
In an environment where there is flowing water, re-circulating currents and snags it is essential to manage the rope effectively.
Management by coiling the rope (as in climbing) is quite unsuitable for canyoning. Flowing water is quick to tangle any dropped coils and it is a nightmare to resolve if any tangles are made. There are also multiple loops which can snag very readily.
Stacking the rope. Prior to entering the canyon the rope should be stacked into your backpack. First, one rope end should be tied to an internal loop, near the top of the bag. The rope should then be flaked into the bag, with the end tied off to an internal webbing loop. This is identical to the way that Kayaking throwbags are set up. This way, only the rope that is actually being used for the chosen technique is ever exposed to the canyon
environment.
Keep an eye on the rope. Don’t be tempted to start rigging a new drop or progressing down canyon with the rope partially out of the bag. Loops can be caught in the current and
swept over drops, or into snags. Keep the rope properly stacked, and be vigilant not to allow any loops or ends out without you noticing.
Re-stacking the rope after use. After the rope has been used, the rope should be re-stacked as soon as possible. This can be done individually, but up to 3 people can make the job faster and easier.
One person should be responsible for pulling the rope down from the anchors.
The second person should help the stacker by holding the pack open.
The third person should stack the rope. The rope stacker should clip the bag’s internal loop to their harness belay loop. A carabiner should be clipped through the helmet chinstrap. The rope should the be clipped through that carabiner. This makes stuffing the rope very fast and easy, as the rope is always right infront of you, easy to grab and easy to stuff into the pack. Return to top.
SETTING THE ROPE LENGTH
Climbers generally use the simplest method of rigging a rappel, which is begun by threading the rope through anchor (bolt chain, webbing, descent ring, tree, etc…). The end is then pulled through, until the middle of the rope is at the anchor. Next, the whole rope is thrown over the edge. The absieler then attatches their descender to both strands of rope and off they go.
This technique works just fine in a ‘dry’environment. However, imagine a 20 meter rappel into a swimming pool, using a normal 60m rope. Due to the length of the drop, 20 meters of rope will be dangling in the pool, like one big pile of spaghetti. Now imagine arriving in the pool, and having to try and remove your descender whilst treading water. It would be difficult, be prone to dropping the descender and result in a huge messy tangle to sort out.
Now imagine a 20m rappel into a grade 3 white water ‘hole’ or ‘boil’ with that same 60m rope. Firstly, trying to simultaneously tread water in a hole whilst removing a descender will be extremely difficult, resulting in plenty of time under water rather than above it. Secondly, that 20 meters of rope is now a swirling, tangling mess. Like the arms of an octopus, it wraps on to anything in its path. Many European mountain guides lost their lives this way when the sport was just beginning. Now you can see why this is a very dangerous technique.
The simple solution is to ‘Set’ the rope length. Instead of threading the rope through to the halfway point, only enough rope is pulled through so that the end of the rope is just touching the surface of the water. The rope is then fixed in some way at the anchor and the canyoner descends a single strand of rope. At the end of the drop, all the canyoner has to do is rappel off the end of the rope and begin swimming to safety.
No tangles, no treading water, no manipulating carabiners in deep pools.
How do you know when the rope is set?
If you can see the end of the drop from the top.
It is a simple matter of visually checking that the rope length is correctly set. This may require you to be on belay while you are near the edge looking over. You also may have to coil and throw the rope more than once to be certain the length is correctly set.
If you can’t see the end of the drop from the top
Guess the height of the waterfall, then subtract about 5-10 meters. Thread the rope through the maillon, coil up that length of rope, then throw it over the waterfall.
The first canyoner rigs thier descender and begins to descend the rope (which is too short). Generally, once the Canyoner is over the edge, they should be able to see down the pitch, and determine how much more rope is needed (either just by looking, or by re-coiling and re-throwing the rope). Then the anchor manager unlocks the Releasable Systems(see below) and lowers the Canyoner the correct distance. The rope is now set.
It may require hand signals or whistle blasts to communicate the amount of rope when the first Canyoner is to be lowered and when to stop lowering. Return to top.
USE RELEASEABLE ROPE SYSTEMS WHEREVER POSSIBLE
Imagine being on rope in a ‘dry’ environment, such as being on a lead climb or rappelling down a route. If something were to go wrong, such as a lead fall or a jammed descender, both of the end results could require assistance from the team, but none of them would require immeadiate assistance in order to preserve life.
However, if you transfer such scenarios into the canyon, where there is flowing water, current, deep pools etc, then something going wrong could result in a person being under a waterfall or under water in a pool, unable to breathe and unable to escape by themselves. In this case they require immeadiate assistance. I.e. if things go wrong in canyoning, you may have seconds rather than minutes to react.
To mitigate this risk, any time a rope is used for progression through a canyon, it should be rigged so that it can be released when under tension and then lowered immeadiately.
When should you lower someone?
Only when they have jammed their descender and they cannot fix the problem themselves. The most likely scenario is a less experienced canyoner allowing a loose item to get caught in their descender. The most dangerous scenario is that happening when the person is rappelling through a powerful waterfall.
When is it dangerous to lower someone?
Perhaps the most dangerous situation when rappelling in a canyon is a vertical foot entrapment within a waterfall. The canyoner descends, or is forced down by the power of the water, to a point where a vertically oriented crack traps their foot. Usually, the only way out of such a trap is pulling the foot upwards. If the canyoner is being forced down by the water, being able to self rescue by ascending would be extremely difficult, or maybe even impossible. Being lowered from above would make the situation worse, inverting the person under the waterfall, making it virtually impossible for them to self rescue. Their only hope of rescue is being raised from the top with a mechanical advantage (pulley) system, enough to be able to release their foot.
So how do you know whether to release or to raise?
Often, a team member at the top or another person at the bottom of the pitch will be able to see the stuck canyoner and communicate the best course of action to the anchor manager.
However, it is also common for the first person down to go out of sight. Any excessive delay in noticing the weight come off (as they go off rope) could mean they are stuck, with a jammed descender or foot entrapment.
But there is no way to know from above what the problem is. The first person down should be one of the most experienced canyoners, who knows to be extra vigilant and cautious about foot entrapments or jammed descenders. And the anchor manager should know the additional risk for the first down. Before any pitch that goes in the flow, those two canyoners should discuss the pitch and what the first action of the anchor manager would be in case of a problem.
So what about the last person down?
The only exception is for the last man at risk (LAMAR), where it may not be possible to have a releasable system. The LAMAR is usually the most experienced canyoner, who has been attending the releasable system and watching all the team make their descents. Thus, the LAMAR will have observed where the tricky sections of the drop may be, and will have confirmation of any difficulty/danger from those at the bottom.
For rappelling, a releasable system is also called a Contingency Anchor.
Here are direct links to examples of Contingency Anchors;
For the LAMAR, here are examples of how to block the rope. Return to top.
CANYON SPECIFIC ABSIELING/RAPPELLING
Though it is more common in NZ to refer to Absieling, I use the European/American term Rappelling, for more consistency with overseas Canyoning terminology.
Most climbing belay/descending devices are designed to work best on double strands of rope. Now that we are descending only a single strand of rope, it is important to know how to rig your descender with enough friction.
When climbing, it is quite common to use some method of self-belay when rappelling. This can take the form of some autoblock, or prussik, either above or below the descender. This is often good practise in the mountains for a number of reasons; preventing loss of control on rappel, allowing you to easily stop on rappel without having to fully tie off etc…
However in a Canyon, when rappelling through waterfalls, an autoblock/prussik can add more risk than it removes. Often it is important to be able to rappel quickly past a nasty water feature, or ‘bounce’ over the main current of the waterfall. With an autoblock/prussik, these can grab inadvertently, causing you to get stuck in a bad spot. Also, if someone were to slip and hit their head and let go of the rope, it is usually better that they splash down in the pool (with no autoblock) than be stuck unconscious in a waterfall (with an autoblock). As such, there is a ‘deep water belay’.
The exception to the rule is when the landing is extremely shallow or on firm ground. In that case, the simple solution is for another Canyoner to provide a firemans belay for the others.
Extra care must be taken to minimise dangling equipment, packstraps etc which could be caught. Self rescue on a rock face with a jammed descender is much less time critical than inside a powerful waterfall. Any gear that isn’t required frequently, or in a hurry should be stored inside the pack and not on the harness. Return to top.
BASIC JUMPING TECHNIQUES
Jumping is an aspect of canyoning that is just pure fun, with a little bit of excitement thrown in. Check out a video montage of Kiwi Canyoning Jumps. So you could easily imagine, jumping is also the culprit in the vast majority of canyoning incidents causing injury.
Look before you leap. No matter how clear and deep the water looks, it is always important to check out any pools before jumping. Often, the depth of water is very tricky to estimate from above, and obstacles such as larger rocks, sticks etc may blend in to the pool bed.
Wether you rig a temporary anchor or have them downclimb, get someone down in the pool with a set of diving goggles/mask for a good look. Without the mask, it is very difficult to make a safe appraisal of the pool. This person can then give the all clear, or point out obstacles. It is important to be very clear when communicating, between the location of an obstacle and the safest part of the pool. Previously, people have mistaken the signals and lept straight onto a submerged boulder.
Read some more thoughts in a my blog post about ‘Jumping is a team activity‘
Normal jumps. A good jump starts from a stable launch point and ends with a controlled landing in the correct spot. The body position should be vertical, with arms tucked in firmly, legs together and knees slightly bent. The tucked in arms prevent ‘chicken winging’ and injury up on entry to the water. The bent knees is to absorb any
force, should you plunge deep and touch the pools bottom.
Shallow pools and flat landings. Sometimes a low jump into a relatively shallow pool
is safer than downclimbing and faster than rappelling the whole group. If you are told to ‘land flat’ imagine that there is a ‘Lazy Boy’ armchair in the pool. Your job is to land aligned with that Lazy Boy. The idea is to present maximum surface area to the water to reduce the depth that you plunge. Such a jump will slap your back quite firmly, but with a wetsuit on, its not a problem.
High jumps. On any jump over 10m, it is very important to have a stable launch point so that you arrive in a good controlled orientation to the water. It is extremely important
land vertical and to lock in the legs and arms as tightly as you can to prevent any chance of injury. Obviously, Its not wise to make any high jumps until you can reliably make every low jump. Return to top.
BASIC SLIDING TECHNIQUES
Slides are another pure fun part of canyoning. Slide landings should be inspected as per jumping. Small slides can be done just like a playground slide, by sitting down and enjoying the ride.
Longer, higher, faster slides should be made by lying with your back against the rock (to avoid rotation and a face plant should you go over a small drop or bump). Your feet must be first, with ankles crossed (so your legs dont do the ‘splits’) and knees bent (to absorb any impact if you hit something by mistake). Your hands should be crossed at the wrist, and rotated so you can interlock your fingers. (Again, it stops your arms flailing, and keeps your elbows away from the rock during the slide). Return to top.