


Problem solving to get yourself down a drop where there are no existing anchors is one of the great challenges of canyoning, but there’s also something pleasant about a descent where all you need to do is rig the anchors rather than find them and build them yourself. Although many of NZ’s canyons are not fully bolted, there are a handful of ‘Sport’ routes which have well equipped anchor stations.
As any canyoner (should) know, an anchor is vital to get down any drop that can’t be jumped or downclimbed. If there isn’t an anchor in place, you need the skill, experience and equipment to build your own anchor, otherwise you are going to be stuck.
‘Permanent’ anchors should be situated so they are protected from damage by normal floods or rock fall, but even well situated anchors sometimes get damaged or destroyed. And if you are the first person to arrive at a freshly ruined anchor and you don’t have the right skills or equipment, then you’re in a bit of trouble.
But how do you decide how much anchor gear you should take through that well-known canyon???
The question is much easier to answer if you’ve been through the canyon before. Because you’re an observant canyoner (which every canyoner should aspire to be) you’ll have noticed the characteristics of all the anchors in the canyon.
Are they flood prone?
Try to imagine what the canyon would look like in a flood. Look at the shape of the canyon walls, and think how they would deflect and channel the water. Can you imagine a way the water could be directed against the anchor and therefore potentially ruining it? Anchors can be destroyed by direct impact from boulders in the flood waters, but also the force of the water, or even the wind gusts caused by the torrent can have the power to work on webbing/chain/hanger and loosen the nut until it falls off.
Well placed anchors are often relatively high on the canyon walls, on surfaces that face away from the water, or are protected from high flows by some sort of rock protrusion. The narrower the canyon, the more inventive the anchor placements have to be to keep them safe.
If you observe that 3 of the anchors could be flood prone, then thats a good reason to add equipment to repair or replace anchors at those 3 locations…
What are the bolts made of?
There are several different types of bolts that you can find in a canyon, and knowing what sort of bolts are present can give you a clue as to their durability, as well as what equipment you might have to bring to make a repair. The three main types are Spits (aka Terriers, Cheville Autoforeuse or Self Drilling anchors), Expansion Bolts and Glue in Bolts. There’s plenty of information about all these anchors online, its beyond the scope of this blog post to go into depth, but its worth reading up to understand the pros and cons of each type..
Once you know what types of bolts are present and how many could perhaps be flood prone, you can make an informed decision about how much spare equipment is needed as a contingency to repair any damaged anchors.
Spits
Spit was the brand name for the original self drilling anchor that became very popular with cavers. They are often carried in an emergency hand drilling bolt kit, because they are faster to place than a standard expansion bolt. So this means if you come across a spit, it is probably from the first descent (ie perhaps quite a while ago) or placed in an emergency.
You can recognize Spits by the fact that the hanger is attached by a M8 bolt. If the canyon has spits in it, its worth considering carrying a few spare M8 Bolt/hangar/maillion combos to replace any damaged/missing parts. The bolts/hangars are sold as a unit, Petzl Vrilee being a common model.
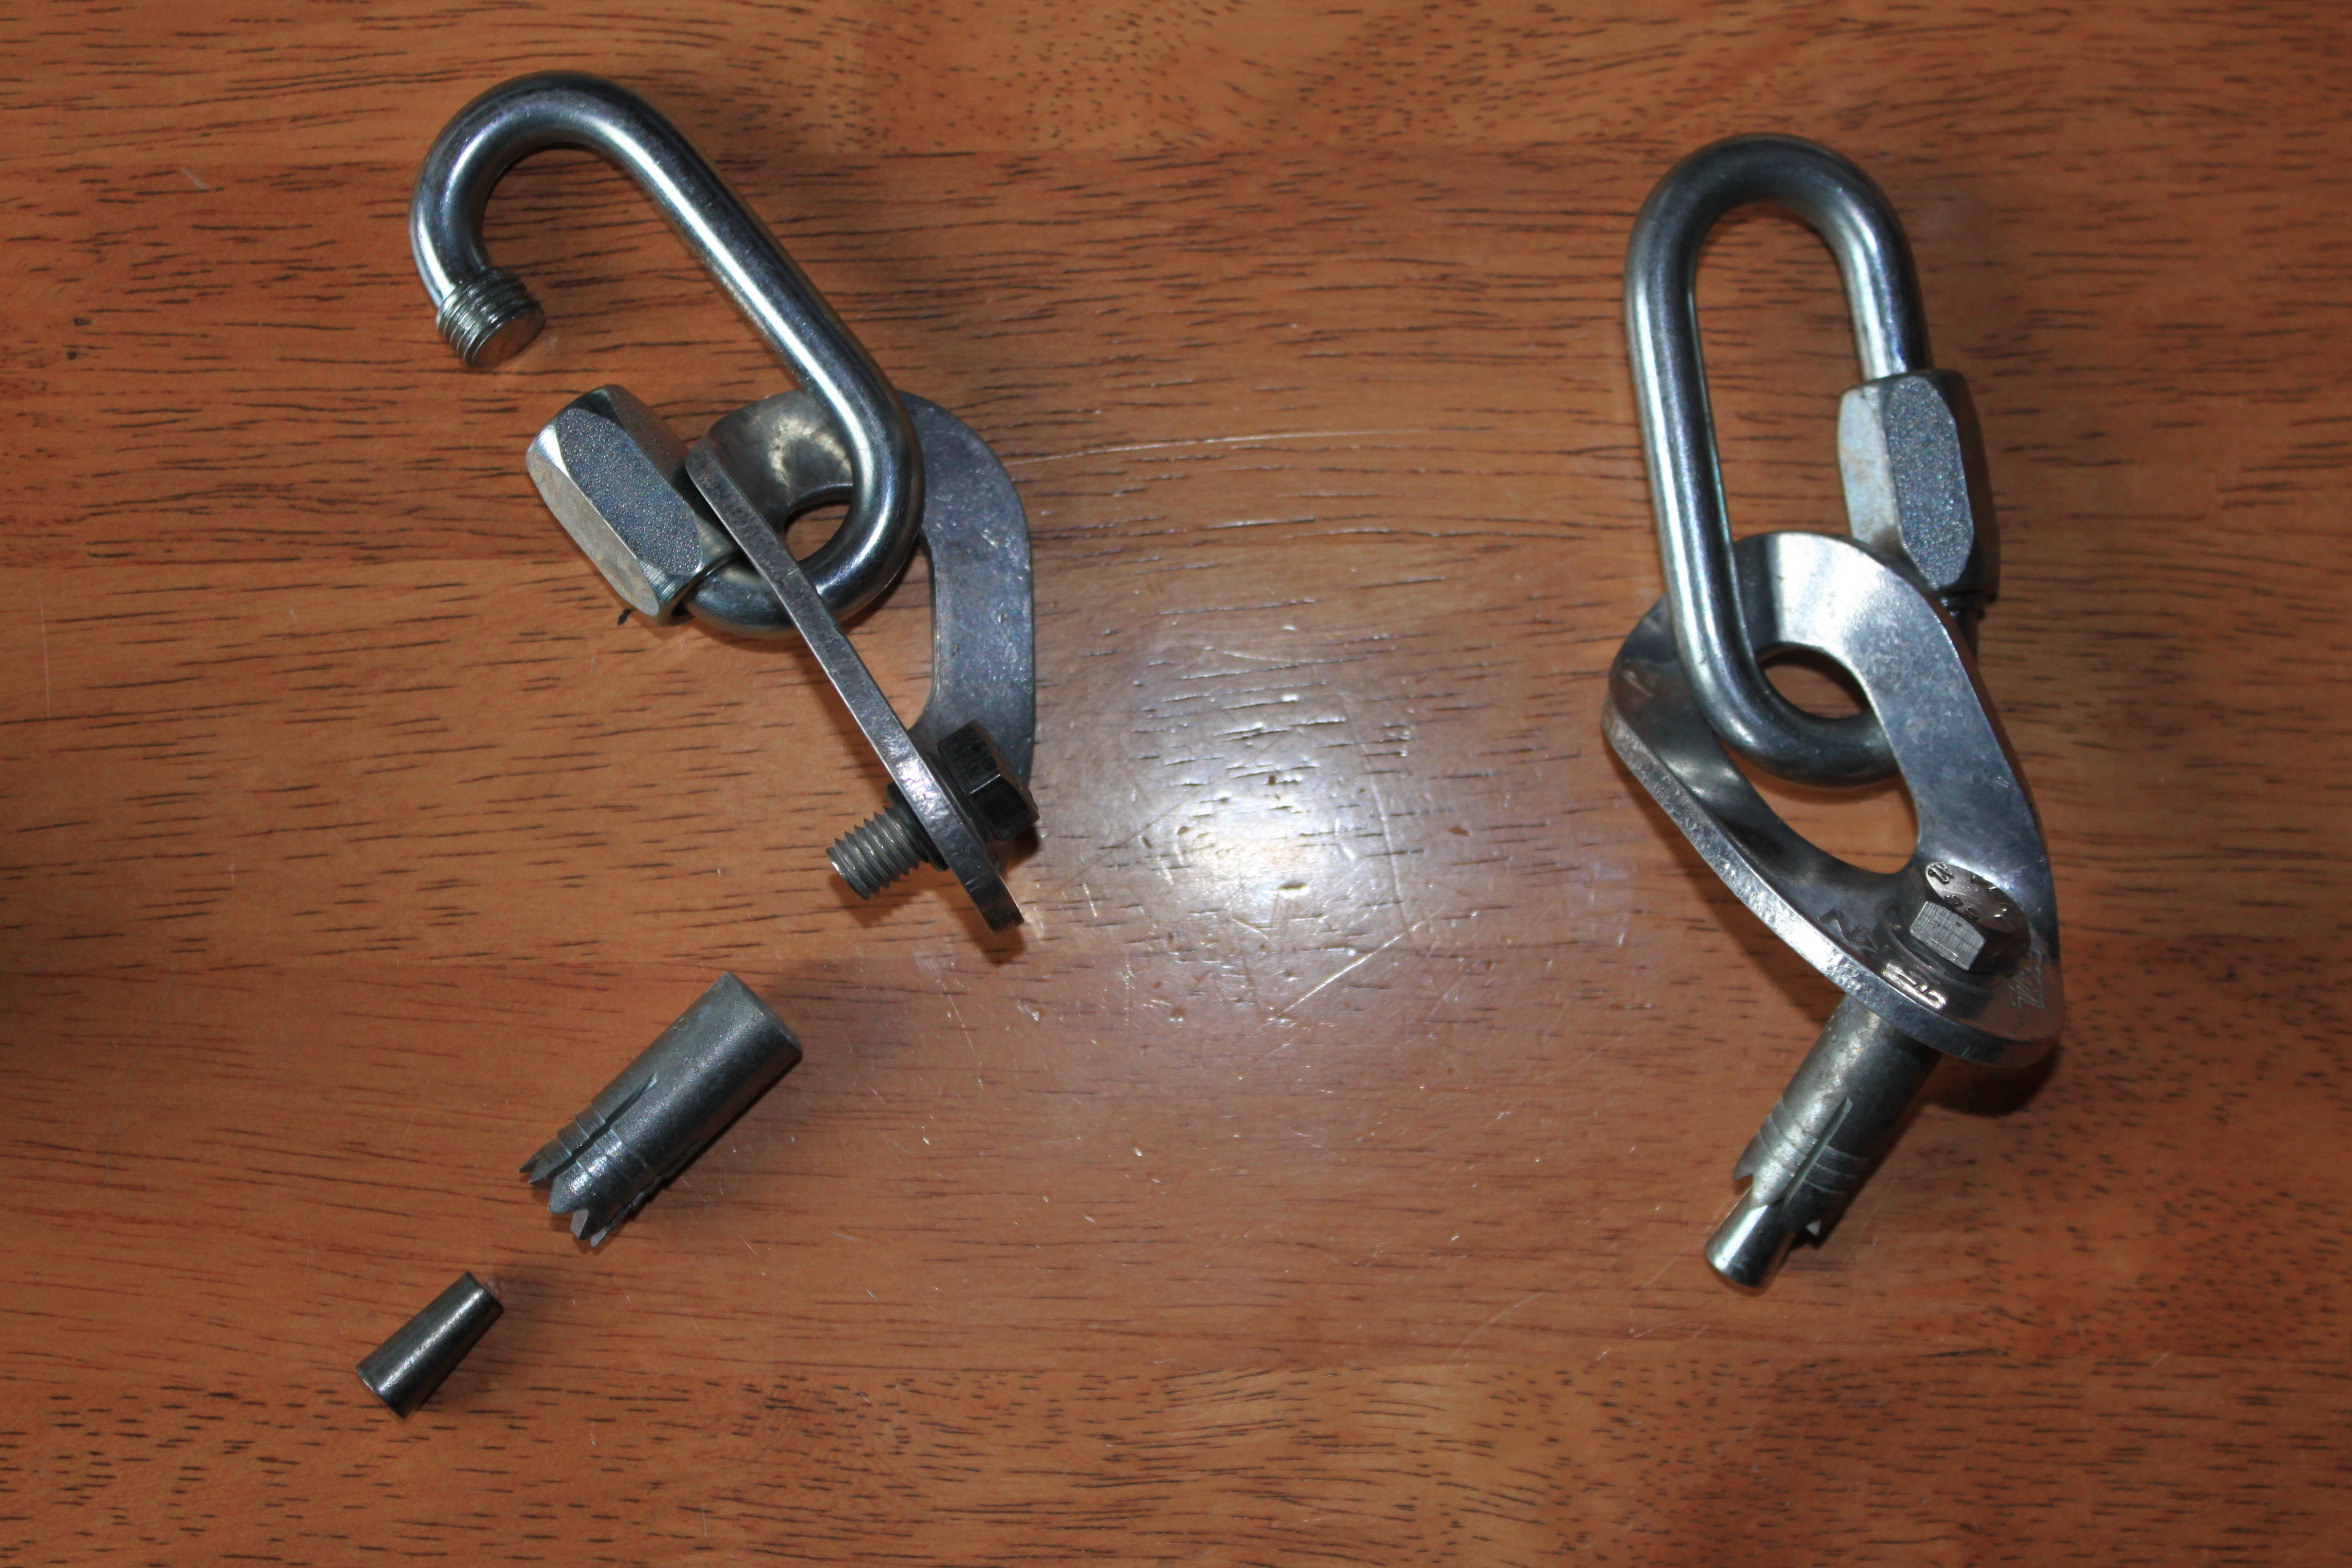
(L) a Spit, showing all the seperate parts. (R) the assembled Spit. (Photo D.Clearwater)
Expansion bolts
There are many different types of expansion bolt, however the current best practise in NZ anchors are stainless steel ‘tru-bolts’. Again, there’s plenty to learn online about these bolts. Tru-bolts are usually placed using an electric hammer drill. 10mm is a common diamater for the bolts, which form a reasonable compromise between weight, safety, lifespan and cost, although 12mm and 8mm may be found in some canyons.
You can recognise expansion bolts by the fact the hangers is attached to the threaded stud by a nut. If there are expansion bolts in the canyon, its worth considering carrying a few spare hangar/maillion/nut/washer combos.
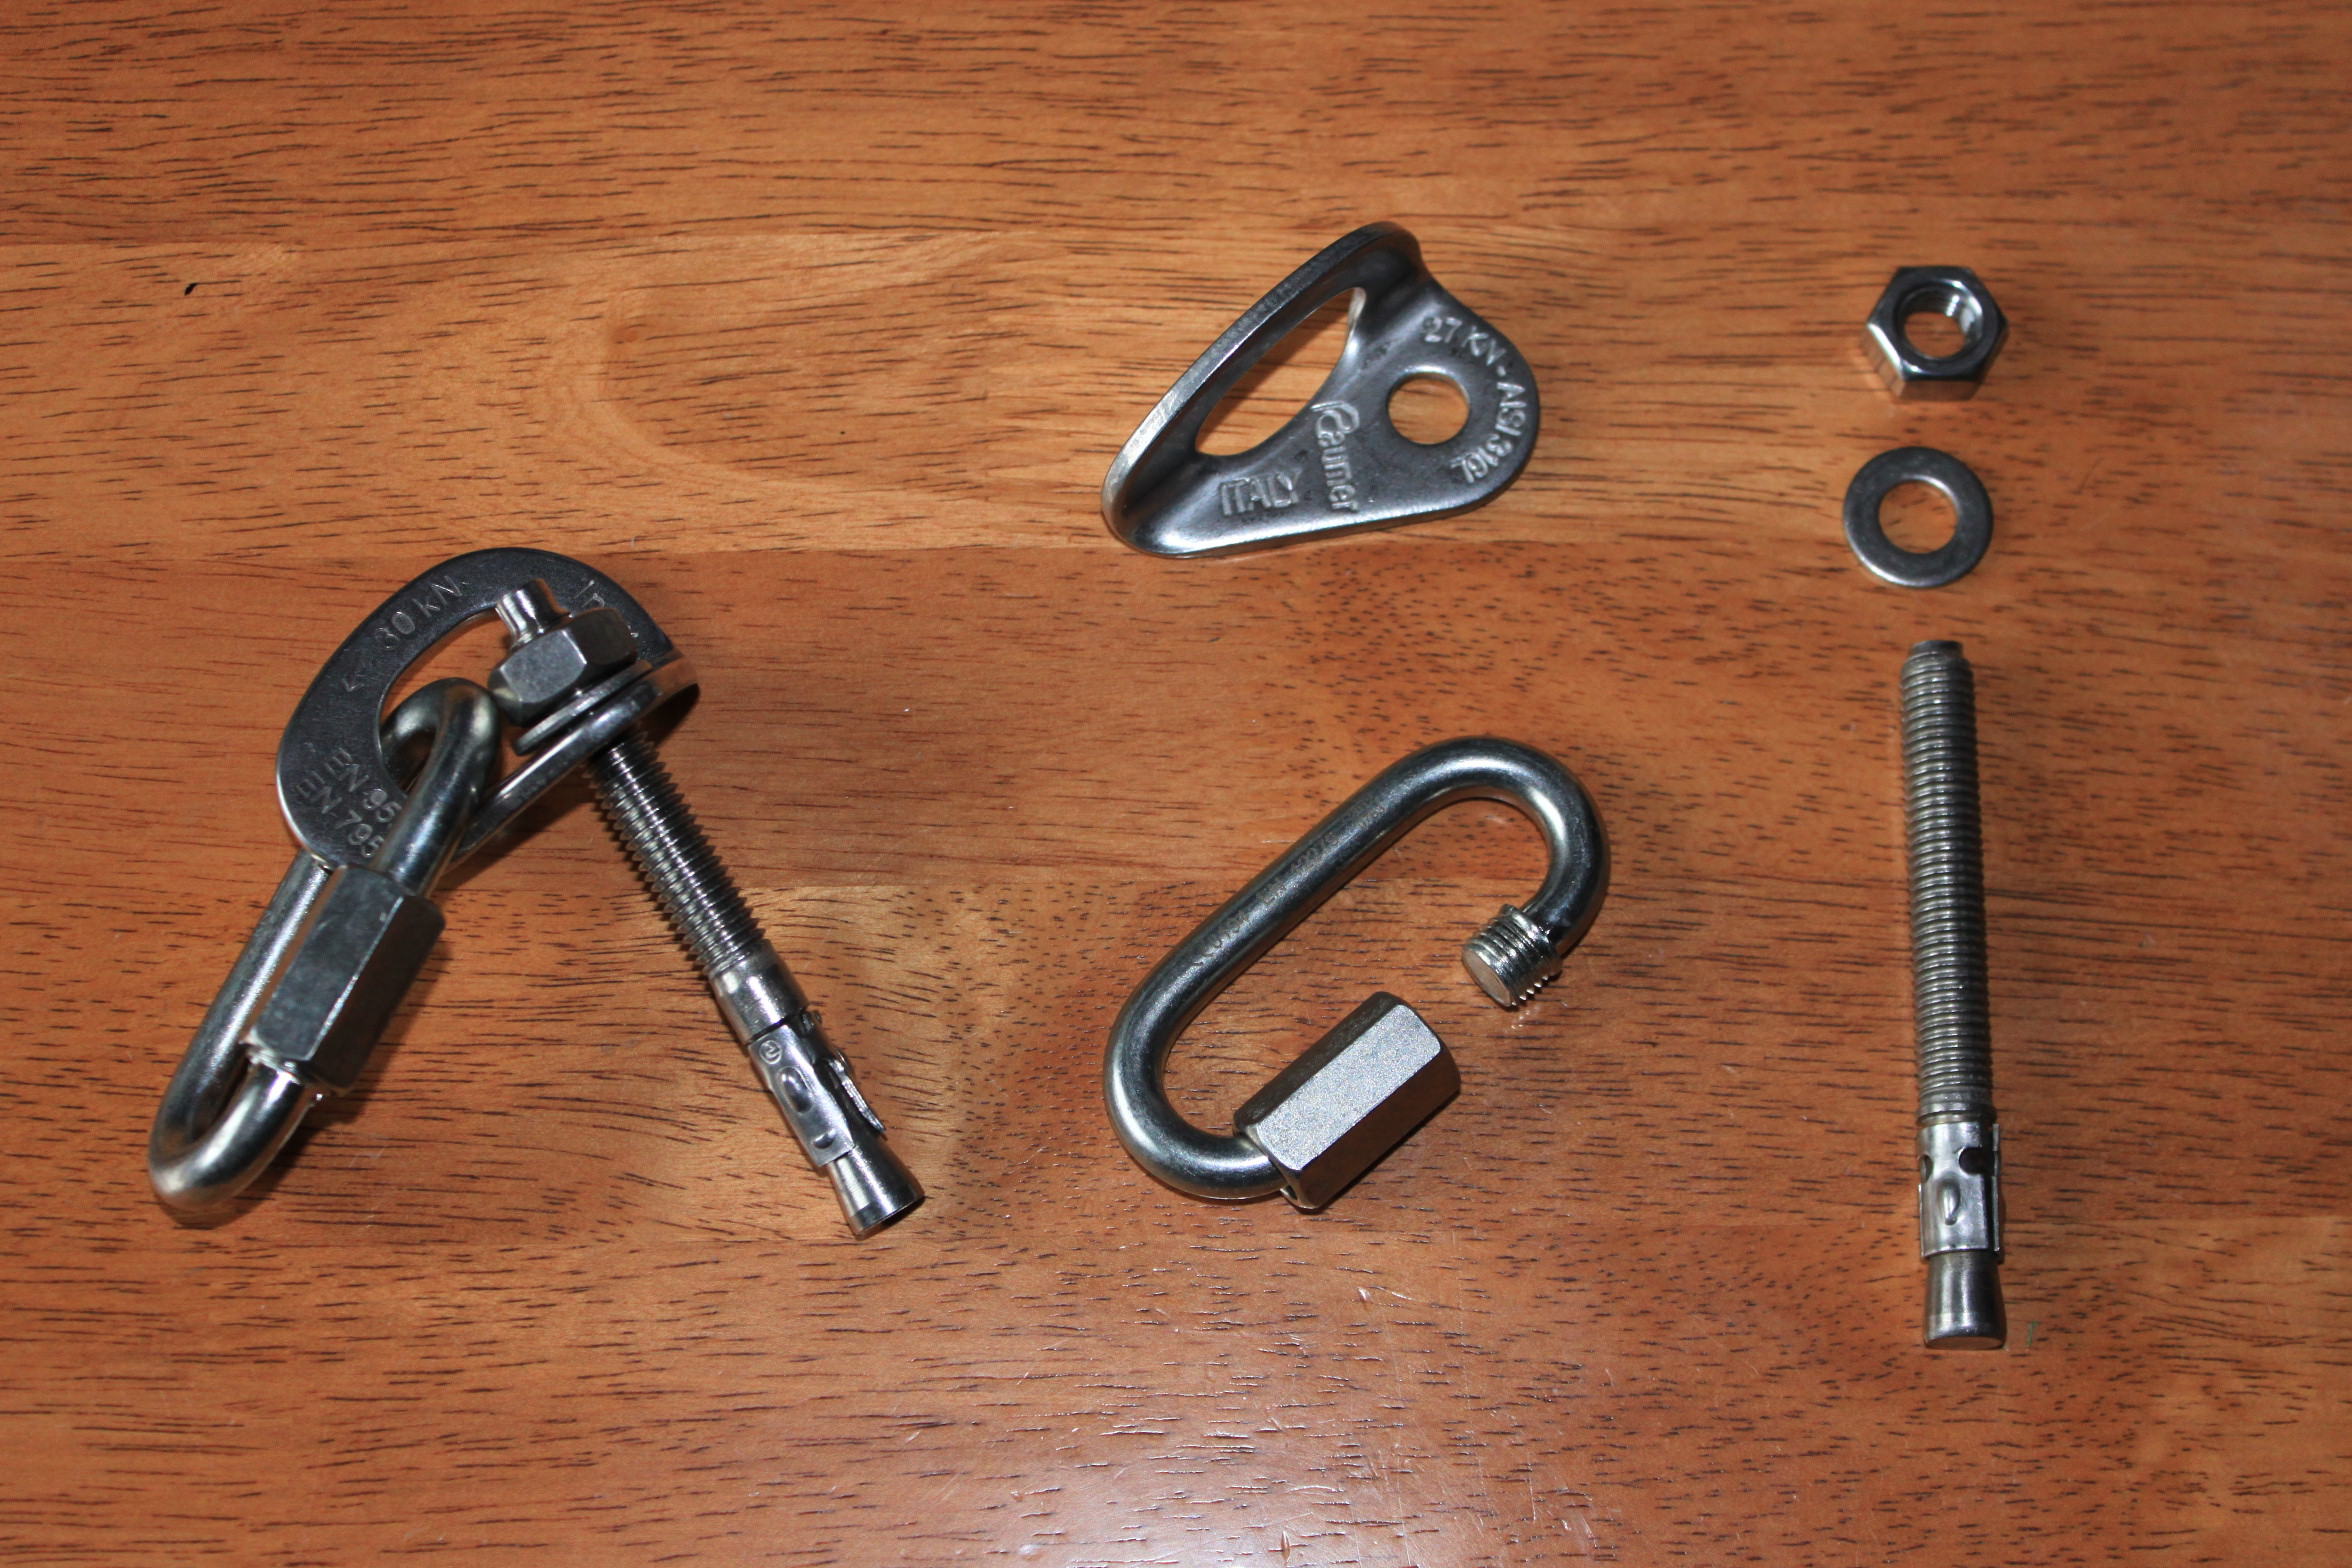
(L) Complete 10mm Stainless Steel Ramset Tru Bolt. (R) the separate components of the anchor. (Clockwise from top left) Hanger, Nut, Washer, Stud, Maillion. (Photo D.Clearwater)
A couple of nut/washer/hanger/maillion combo’s which live in my keg, along with a small adjustable spanner for anchor repairs. (Photo D.Clearwater)
Glue in bolts
Again, there are countless types of glue in bolts that can be used as canyon anchors. Glue in bolts require a lot of time, effort, expense and expertise to place. A well placed glue in bolt is the strongest, longest lasting anchor solution available. For these reasons, they are most commonly found in canyons which are run commercially.
Glue in bolts can usually be recognized by the fact there is no separate hanger, and there is no obvious way to use a spanner or tool to tighten them up. There are some glue in bolts that have a nut which attaches the hanger, but this style of glue-in threaded rod is not common.
There is nothing that can be done to repair most glue in anchors, but they are the least likely to need repair.

10mm x 80mm Stainless Steel Glue in Eye Bolt (Photo by Fixe)
Using a spanner: How much should I tighten the bolt??
A small adjustable spanner is an essential tool to attach any nut/hanger/maillions to damaged bolts, as well as to tighten any nuts which are found loose.

How much should you tighten a bolt? Each manufacture will specify the exact torque required to correctly tighten a bolt. For example, Petzl says 15Nm for its Spit Anchors. 15Nm (Newton-Meters) is the force of 15 Newtons (approximately the same force as the weight of a 1.5kg object), applied with a 1 meter long spanner. So if I have a 20cm long spanner, I’ll be applying a force about the same as hanging a 7.5kg object on the end of the spanner. So its not that much torque at all, perhaps just the force you can apply using your wrist and forearm.
In comparison, Ramset says to torque its 10mm tru-bots to 32Nm, which works out to be about the same force as a 16kg object on my 20cm spanner… Which is a fair amount, perhaps the force you can apply using your whole arm, but not any of your body weight…
It’s worth knowing your gear, and knowing the appropriate torques needed. Get a ruler, a set of scales and develop a muscle memory for what is correct…
In the canyon, the nut needs to be tightened sufficiently for the anchor to be strong and not come loose, but not so tight that you damage the anchor. Over tightening can cause damaged by stripping threads of nuts or studs. Over tightening a nut on a spit can possibly deforming the nut, making it weaker, or even shearing a nut head off. When the rock is soft, you can often see the stud of an expansion bolt (threaded part) protruding out significantly above the nut. This nut has been tightened and tightened trying to get a good torque, but instead it has continually been crushing the rock surrounding the expansion part of the bolt. Tightening such a bolt again will crush more rock, and also reduce the amount of the stud inside the rock, decreasing the strength of an already weak anchor.
What if I haven’t done this canyon before?
Then its up to you to do your homework. Ask about the condition of anchors in forums online. Figure out when the last people went through, and look at historic rainfall data to see if there were any floods since. If there was little to no rain, you can be more confident that things won’t have changed since the last person’s descent. If there was a high water event, all bets are off and you need to consider what the condition of the anchors might be and take appropriate gear. This is where asking about the types of bolts in a canyon, and how well set up things are can give you clues about how much gear you need to bring. As well as taking repair/replacement gear for bolts, a smart canyoner will take a stash of natural anchor equipment ‘just in case’ until they get to know a canyon well. When you get to know a canyon, you develop a good feel for the amount of contingency gear that is appropriate. But even in a well known canyon, it only takes one spot where you can’t descend to make you stuck…..
In short, its only you and your group who can take responsibility for your safe descent. Its usually better to have a bit too much gear which doesn’t get used, than not enough gear and you end up stuck in a canyon waiting for a rescue which might be a long time coming…….
Excellent article thanks!